ASM day 5: Stacks, and my burger stacking program (Part I)
The start of making something interactive
Welcome back to my assembly learning diary once again! Today I’m learning about the stack ability of the 6502 processor. Then, I’ll try to apply this knowledge by making a program that you can run online in Easy6502.
First off, what I know beforehand, is that a stack is something to put values into and read values out of quickly. I presume different types of stacks have different patterns like first or last in, first or last out (FIFO comes to mind). I presume the 6502 will only allow for one such type though.
A stack of dishes
This time I consulted both Easy6502 and this other blog post.
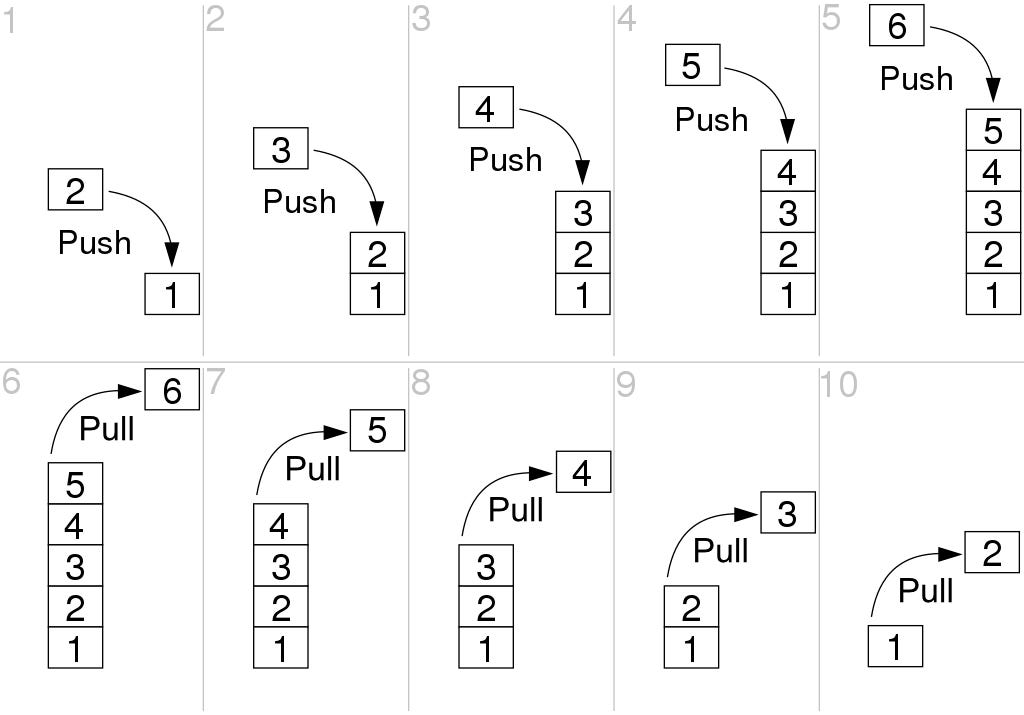
A stack is something you “push” values onto, and “pull” values off of. This is what the Push Accumulator (PHA) and Pull Accumulator (PLA) instructions do, which I previously only knew the name of.
The stack is “last in, first out”. It’s compared to as a stack of dishes, where you are only able to put on a dish or take off a dish from the top of the stack. There is an illustration from Wikipedia for this:

I do not know the exact use for this feature, but considering the limited instructions and cycles we get on the 6502 I can certainly imagine it to be an effective way to handle a list of data. With these types of analogies, I can also think of a way to demonstrate this concept visually with a program. More on this later… 🍔
I analyzed the example program and added comments to make sense of it. In short, we can store values into the stack with PHA and take them off with PLA. The S register (stack pointer) lets us know where in memory the “top” of the stack is currently. TSX and TXS let us read and manipulate this value directly.
A tangent: making interactive code
If we are able to manipulate a stack in my program, then I want to make it user interactive. Luckily, Easy6502 has a simple register $ff that contains the last key the user has pressed while running the program, as an 8-bit ASCII code.
Because we also want to know when a key is pressed, we have to come up with another part of the logic ourselves. For this test program, every time you press a key a new pixel is “typed” to the screen. This is what I made:
(code available here)
In that recording I’m mashing a whole bunch of keys, and as you can you see it’s working as it should! By achieving reliable input polling, we open the doors for all new kinds of programs.
The burger stacking program
My idea is to demonstrate the stack by using a hamburger analogy. Burgers are made of various ingredients stacked together, so this is allows us to visualize what’s in stack memory in a very blatant way! My plan is that you can use the 1 to 7 number keys on your keyboard to place the various pieces such as the buns, lettuce and patties. Then by pressing 0, you remove the topmost ingredient — exactly like how the stack works inside of the 6502.
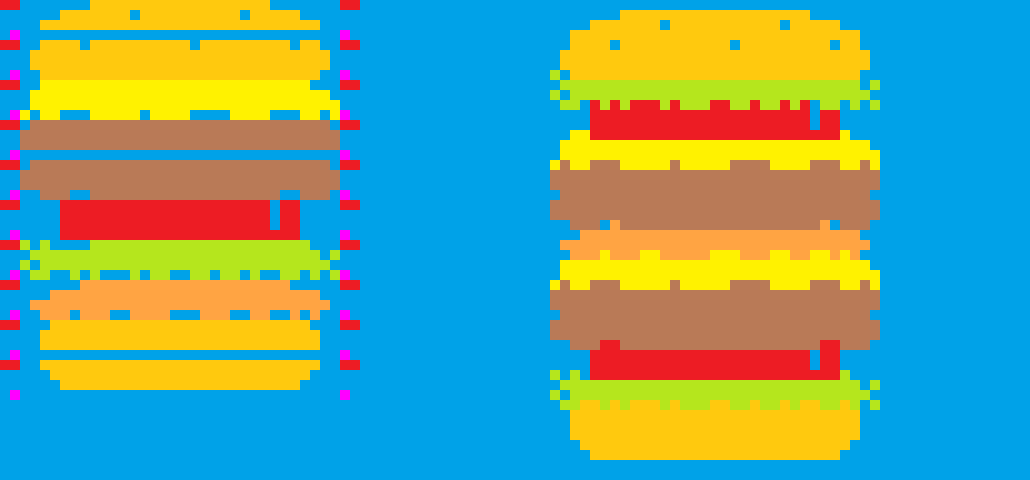
Starting off, I created the burger sprites.

I had a ton of fun drawing this. I tried to make each piece look as tasty as possible, all while looking at pictures of burgers for reference (making me incredibly hungry). I caught myself talking out loud, tastefully describing how each line of pixels makes the burger look more nice and delicious, resembling some kind of fast food-minded Bob Ross.
I used very specific constraints in order to get the maximum effect out of minimal programming:
Each piece only uses 1 color.
This way, I can use simple run length encoding. As an imagined “pen” moves across the screen, the only thing I need to specify is when it’s down (drawing), and when it’s lifted. This saves memory, lines of code, and speeds up drawing.
Each piece is 4 pixels high, starting at the red pixels.
This means the bigger pieces (the meat and buns) are made up of two slices while looking like one. The program code will need to place both of them at the same time, but that’s about it.
The 4th row at the pink dots is what I call “overhang”, and is drawn over the piece beneath it.
This achieves a more complex looking effect by simply drawing the slices with 1 pixel of overlap. The mockup shows how effective this is, with the dripping cheese overlapping the meat patty.
I think assembling burgers is as much fun as I can provide you with a simple program right now. c:
The structure of the program
I have not finished the program of this day yet, and as such it is merely Part One. For reference, the work in progress code can be found here.
This is the plan I have in mind:
The pieces
Each piece will have its own value, so that the stack in memory plainly lists out the pieces in consecutive bytes.
; Burger pieces:
;  #$00 - nothing
;  #$01 - bottom bread A
;  #$02 - bottom bread B
;  #$03 - sauce
;  #$04 - lettuce
;  #$05 - tomato
;  #$06 - patty A
;  #$07 - patty B
;  #$08 - cheese
;  #$09 - top bread A
;  #$0a - top bread B
Init:
In memory addresses $00 to $08 we will store the colors that the individual pieces should be drawn with. The address numbers match up with the values above.
We should also initialize the stack for the first time here.
StoreGraphics:
Here we will write to memory each of the “pen down” and “pen up” timings for all slice types, using the aforementioned RLE. I’m hoping this is less work and more effective than storing each pixel individually.
FillBG: Starting off with a colored screen
As in my mockup, I think the graphics will look better without a black background this time. I figured out how to draw to the entire screen in a simple way. Here is the code!
FillBG_init:
 LDA #$02          ; ╮ X/$11: Drawing page/high byte
 TAX               ; ╯
 LDA #$00          ; ╮ Y: Drawing position
 TAY               ; ╯
 LDA $00           ; Load background color into A
FillBG_loop:
 STX $11           ; ╮ Draw background color pixel
 STA ($10),Y       ; ╯ to screen using indirect addrs.
 INY               ; Increment screen position
 CPY #$00          ; ╮ Check if Y has overflowed,
 BNE FillBG_loop   ; ╯ otherwise loop.
 INX               ; Increment page
 CPX #$06          ; ╮ Check if X passed enough pages,
 BNE FillBG_loop   ; ╯ otherwise loop.
Because we will have to draw to more than 8 vertical lines this time, we need to be able to address more than 256 pixels. If we can’t do this, then there’s no way we will be able to draw burger pieces all over the screen either!
At the core of this is the indirect addressing mode, as I learned about on the previous day. While we keep the drawing position (Y) in a register like usual, this time we will also keep track of what page in memory we are on (the first byte $XX 00 of an address), and store it in both X and $11. That’s how we store our address of interest for later reference in memory. Indirect addressing will read from $10 to find the 16-bit screen address we want to write to. We simply offset that address with Y like normal. All of this is through: STA ($10),Y — indirect addressing is highly effective!
We use branching to keep two loops going. First we loop until the entire page is filled with our color value. Then we break out of it, increment the page counter, and go back to fill the next page. When that is done 6 times, we break out of the whole program.
Here is what this looks like:
DrawBurger:
Aside from the pen on/pen off technique I use as compression, I have all kinds of approaches in mind here.
When we are stacking the burger, there’s no problem with just drawing each new on top of the the previous one. But because we can take off pieces too, I want a 4 row high rectangle to draw over the discarded piece, (also clearing the “overhang” with it), and then have the top piece redrawn. This way we don’t have to slowly redraw the entire burger stack each time.
PollInput:
This is where a modified version of the input polling code I shared above will run. Nothing needs to happen on screen while the program checks if you hit the 1-7 or 0 keys.
UpdateStack:
Once a key is registered, we break out of the polling loop and add the correct piece or take the last piece off the stack in memory. If a piece is taken off, maybe I will set a flag in memory to trigger DrawBurger to erase the graphic properly.
A short conclusion
From now on, I am unlikely to finish these more complex programs within a single “day”. However, I will still report to you what I’ve learned right after I’ve done it, such is the concept! That means programs will be written over multiple posts, but on the flip side, I won’t be held back by what’s possible within a single session. It should allow me to be as ambitious as I want to be!
Thanks a lot for reading this. I hope you will stick with me until we can both be stacking burgers in the program!


It's a shame the Easy6502 interpreter doesn't document if there's a way you're *supposed* to read keyboard input, but the way you've come up with is simple and works, so I'd call that a win.
That burger looks delicious, even with single-colour sprites. You clearly put a lot of work into it!
For FillBG, remember that you can LDX instead of LDA, TAX. Also, "STA ($10),Y" will produce surprising results if some other part of the program stores some other value in $10, so you might want to explicitly store #$00 there before the loop, just to be sure.
Don't worry about not finishing an entire program in one day, you're learning about the pace of assembly programming as well as the process.
Are ya dead?